TL;DR Demonstration of bridging Avid S3L AVB and Waves SoundGrid using the Waves SoundGrid BR1.
In the video I demonstrate a fifth way of using Waves plug-ins with the Avid S3L. (See my previous vlog for the first four ways.) This solution is quite simple and powerful. I also evaluate the configuration based on complexity, portability, latency, and cost.
The five methods are:
Hardware Inserts
Analog Fx Returns
AVB Fx Returns
SoundGrid Fx Returns (MOTU M64 + DiGiGrid MGO)
SoundGrid Fx Returns (Waves SoundGrid BR1)
Please watch the video, and let me know in the video comments what you think, and what other kinds of videos you’d like to see.
P.S. You’re welcome to read the script I used in planning the video.
TL;DR I’ve you’ve ever wanted to use Waves plug-ins with the Avid S3L, then I’ve got the video for you.
In the video I demonstrate four different ways of using Waves plug-ins with the Avid S3L. While running plug-ins directly on the console is not supported, these alternatives should be attractive alternatives to most sound engineers. I evaluate each configuration based on complexity, portability, latency, and cost.
The four methods are:
Hardware Inserts
Analog Fx Returns
AVB Fx Returns
SoundGrid Fx Returns
Please watch the video, and let me know in the video comments what you think, and what other kinds of videos you’d like to see.
P.S. You’re welcome to read the script I used in planning the video.
TL;DR I’ve you’ve ever wanted to connect a MOTU AVB device to your Avid S3L, then I’ve got the video for you.
In the video I demonstrate connecting a MOTU Stage-B16 to expand both the input and output signal count, as well as how to record from the MOTU in addition to other stage boxes.
The process requires changing an internal configuration of the Avid S3L, but this is a simple one-time process that is reversible if needed. Once the change is made, it should be possible to connect practically any AVB device to the S3L. The process required some trial and error, and some help from the Avid forums, but it works consistently and I’ve used it for a while now.
Please watch the video, and let me know in the video comments what you think, and what other kinds of videos you’d like to see.
TL;DR I’ve you’ve ever wanted to make a redundant recording of an Avid S3L (i.e., record on two computers simultaneously), then I’ve got the video for you.
I’ve played around quite a bit with the S3L and found that it has capabilities beyond those mentioned by Avid. Specifically, the AVB protocol allows for much more, but for simplicity sake, the S3L does not expose anything other than that which is needed to meet common customer needs.
One common need that isn’t addressed though is making a redundant recording, like when one is recording a live performance and wants to insure against a computer crashing or something. As this requires extra hardware, it isn’t something supported “by default”, but with the purchase of an AVB Switch (e.g., the PreSonus SW5E, or the Netgear GS724Tv4 with additional AVB license), this becomes easily possible.
Please watch the video, and let me know in the comments what you think, and what other kinds of videos like this you might like to see.
TL;DR From my initial testing, macOS Big Sur works great with the S3L and S6L.
When I first started testing, I was doing so through the PreSonus SW5E, which resulted in the clicky AVB audio problems I’d experienced with macOS High Sierra (see my previous blog post on the topic.) After upgrading the firmware on the SW5E, everything worked great.
TL;DR I wanted great sound from Apple Music, and I wanted to add an EQ for better video conferencing sound. I didn’t want to change the EQ all the time. Configuring my Mac to use separate outputs of my MOTU 828mk3 was the solution.
I’m the manager of a globally distributed team, and I work with many other teams who are also globally distributed. For me, this means I practically live in video conferences – especially now as I’ve been stuck in home office for the last 9 months! Some of the VCs I connect to sound horrible due to low quality laptop microphones or reverberant rooms, which I find annoying as someone who enjoys good audio.
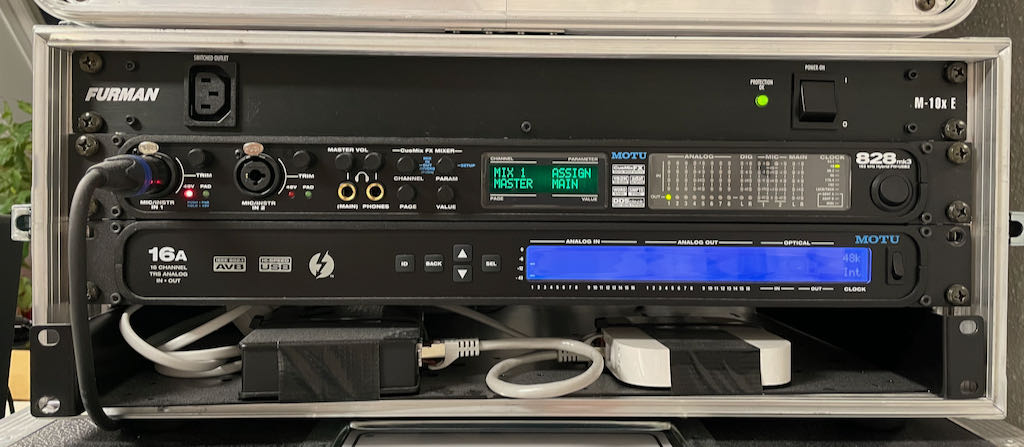
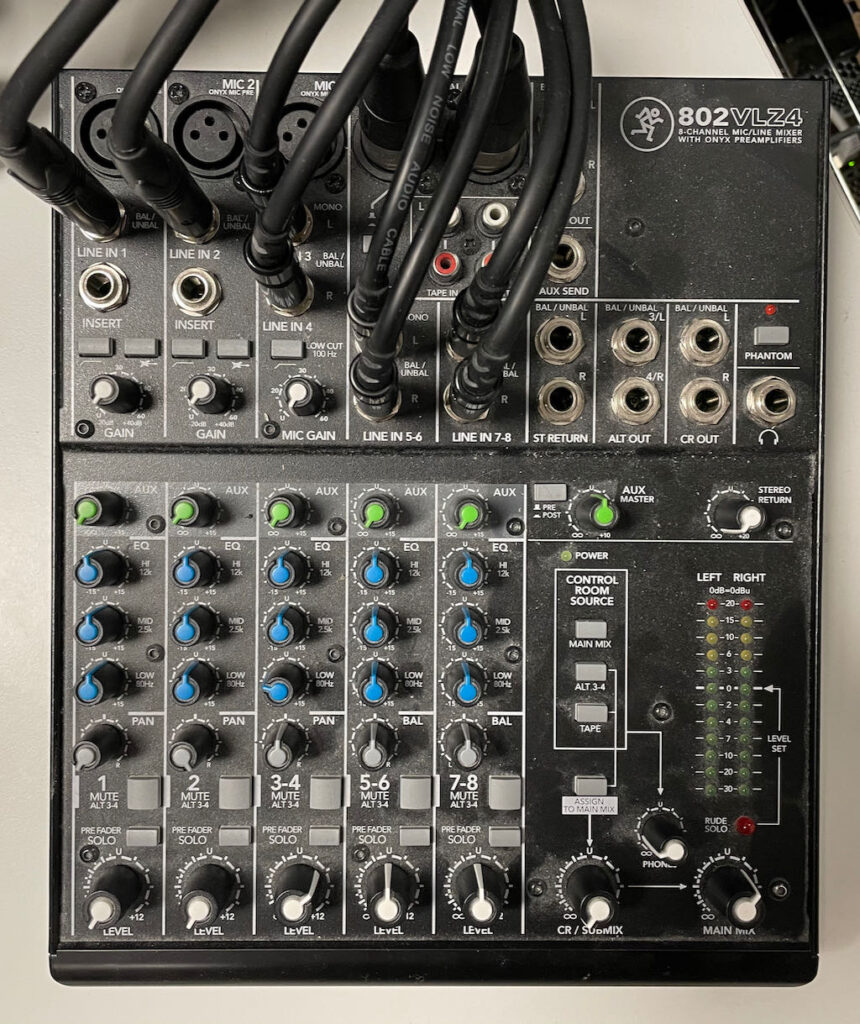
I use a MOTU 828mk3 Hybrid (connected via USB) as the primary audio interface on my work computer. The default L/R channels route out the Main Outs to a Mackie 802VLZ4, which drive my M-Audio BX5 D2 studio monitors and SBX10 sub. I also have a microphone conned to Mic 1. Despite being 9.5y+ old, the MOTU works flawless for me, even under macOS Big Sur!
My MOTU 16A (for personal) and MOTU 828mk3 Hybrid (for work) audio interfaces.
Lately, I became annoyed enough with having the EQ / de-EQ / EQ / de-EQ process as I would go back-and-forth between music and VCs that I decided to do something about it. I had a “duh” moment, and decided to route additional outputs from the MOTU to the Mackie so I could have a dedicated channel for VC.
Steps to achieve my setup
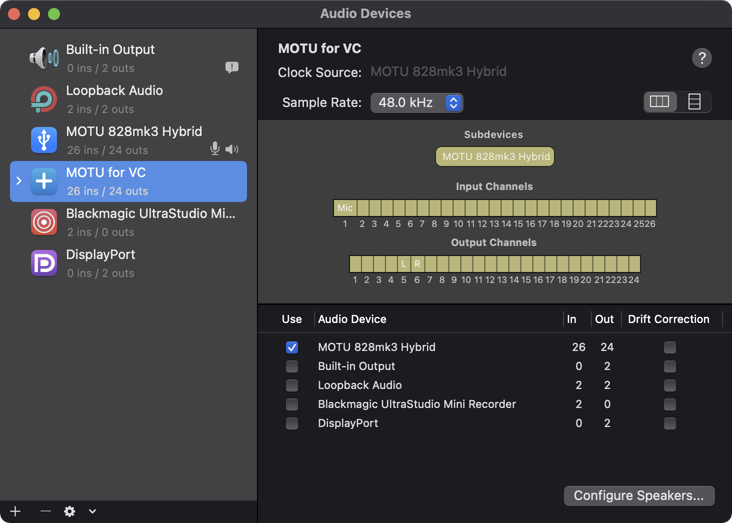
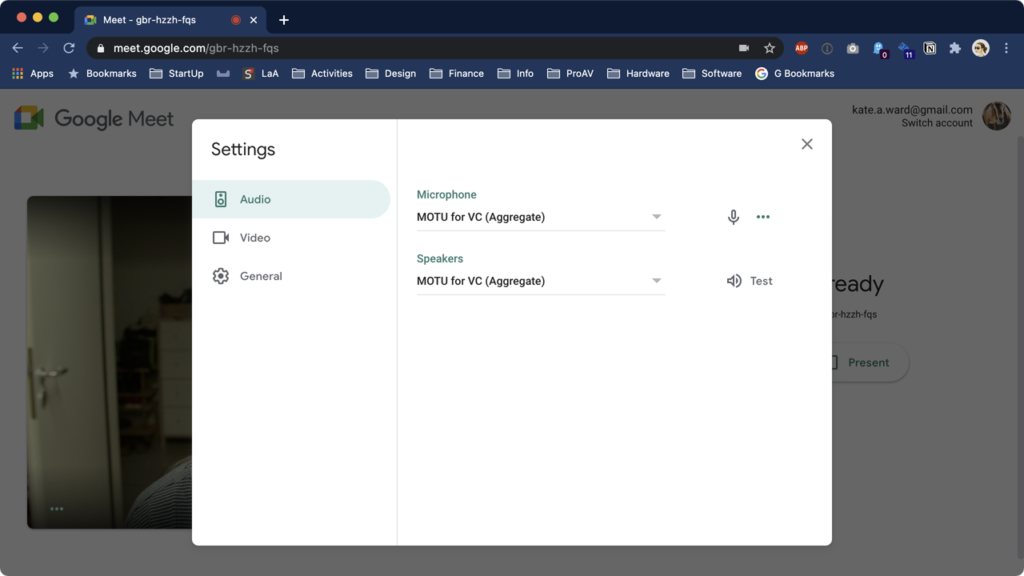
Create an aggregate audio device. macOS has the wonderful feature of Aggregate audio devices, which I normally use to combine multiple audio interfaces into a single audio device. I started by creating a “MOTU for VC” aggregate audio device using only the MOTU 828mk3 as the subdevice. As I’ll be sending the VC audio out Analog 3-4 (output channels 5-6 on this device), I named them L and R so I’d have those names for references in the future.
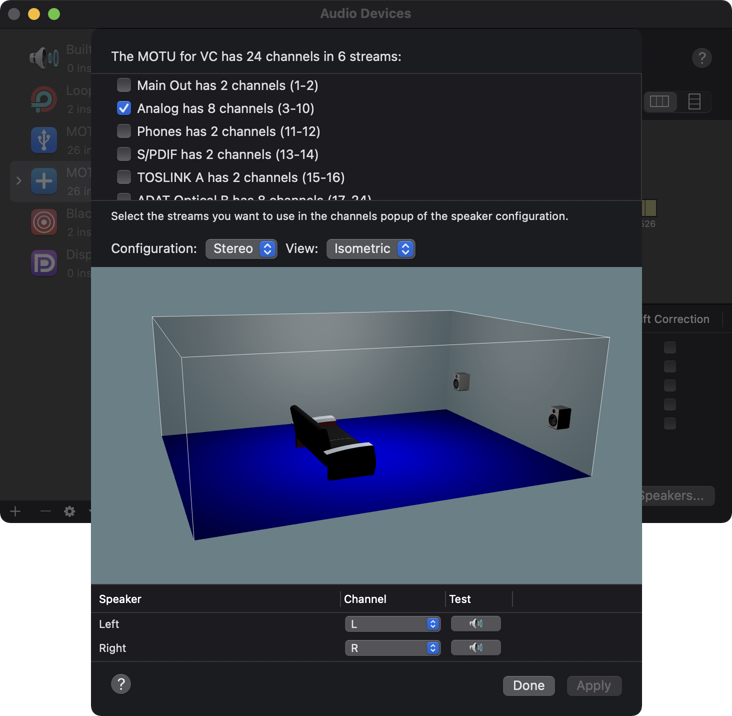
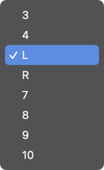
By default, the device uses channels 1-2 for signal output, which route to the Main Outs. To change that, click “Configure Speakers…” to bring up the speaker configuration window. Select the “Analog” stream which supports the desired channels 5-6, and then choose the correct channels for the Left and Right speakers at the bottom.
NOTE: As I named channels 5-6 as L and R earlier, those channel names showed up here as well.
The final software step is configure Google Meet to use the “MOTU for VC (Aggregate)” device for Microphone and Speakers. This step also works for Zoom, Microsoft Teams, and Skype too.
For the hardware step, I now routed cables from Analog 3-4 to channel 3-4 on the Mackie. (Channels 5-6 are the Main Outs from the MOTU 828mk3, and 7-8 are from the MOTU 16A.)
With everything wired, I can now set custom EQ and level values on 3-4 for VC meetings, and still have a clean signal on 5-6 for music. Problem solved!
TL;DR The display resolution on macOS can also impact Lightroom performance. For best results, leave it to the “Default” resolution (especially on 4K monitors), or change it to Scaled / More Space to use the maximum resolution of the screen. Any scaled resolution between the default and max can impact performance.
[Update 2020-08-25] In my testing, Lightroom Classic 9.4 appears to fix the issues described in this post.
[Update 2020-11-10] The newest release of Lightroom Classic 10.0 seems to be even worse than 9.3, despite its many “performance improvements”. Sigh.
[Update 2021-01-17] Lightroom Classic 10.1 is back to the performance levels like 9.4, but overall I still consider it meh.
I’m an avid user of Adobe Lightroom since version 1.0, and have used it on tens of thousands of photos. I’ve tried other software in the meantime, but always came back to Lightroom.
Starting a few years ago, the newest versions of Lightroom felt slower than previous versions, a complaint that many people on the internets have had. I too have had slowness, especially on my 2013 Mac Pro, and this became especially true once I upgraded to a 4K monitor. After a recent Fstoppers article entitled Dramatically Speed up Lightroom Performance, I decided to dig into the problem.
Unfortunately in my case, I’d already tried all of the tricks in the Fstoppers article, as well as those from the linked Adobe article on how to Optimize performance of Lightroom. No matter what I tried, nothing worked. I’ve found one trick though that I’ve never seen mentioned, so I’m sharing it in hopes that it helps somebody else.
Make sure your display resolution is set at “Default for display” or “Scaled / More Space”. Anything else can cause performance problems.
On retina and 4K screens, macOS doubles the screen resolution chosen behind the scenes, and then scales it down by 50% so that text appears extremely clear. The only exception is Scaled / More Space which uses the native screen resolution.
In my case, I normally run my screen at the non-default resolution of 3008 x 1692, which means Lightroom is rendering to an actual display resolution of 6016 x 3384. If I change back to the Default or Scaled / More Space resolution, the actual resolution drops to 3840 x 2160, which is 64% smaller. That difference enables Lightroom to render the UI elements much faster, probably because my graphics cards can handle that better.
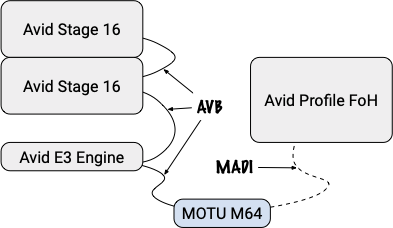
TL;DR The MOTU M64 works great with the Avid VENUE S3L. The tested setup was sending 32ch of audio from an Avid VENUE S3L via AVB to a MOTU M64, converting the signal to optical MADI, and sending it over fiber into an Avid VENUE Profile.
Background
A couple of weeks ago, I had the privilege of working with Patrick Müller and Luca Bruegger of Tonkultur.ch GmbH / Remote Recording Services to connect their Avid S3L system to their Avid Profile system via optical MADI using the the MOTU M64 as a converter.
Patrick and Luca were looking to use a spare Avid S3L console as additional inputs for an Avid Venue Profile console. They normally get a MADI feed from the FoH for their recording, but sometimes have the need for their own on-stage preamps. They wanted the ability to place two Avid Stage 16 stage boxes on the stage, acting as as mic preamps, and send the signals into their existing setup via optical MADI. Unfortunately the S3L doesn’t support MADI.
In their search for a solution, they were pointed at my Avid S3L and 3rd-party AVB Devices article. Seeing that I’ve connected MOTU devices already, they purchased the MOTU M64, and reached out for some help getting it going. Luckily Luca and I have known each other for several years now which made it easy to connect.
Getting it going
Working through the documentation I’ve written, we were able to get the setup working in a couple of hours. This was my first chance to test the documentation on a second S3L system, and I was able to fix some minor mistakes along the way, which should make future configurations go much faster.
A future desire they have is to leave the E3 Engine out of the mix completely, using only the Stage 16 and M64 devices. I’ve started digging into the Stage 16 to see whether that might be possible, and both Luca and I are reading more into the AVB standard, as well as Milan, which is the follow-up standard to AVB. Stay tuned!
[Update 2020-01-14] I’m now able to announce the Stage 16 via AVB so that I can record directly from it with macOS, and I can also manually control the signal settings (gain, pad, and phantom) as well as the LEDs on the front. See what all I have working on my Projects page.
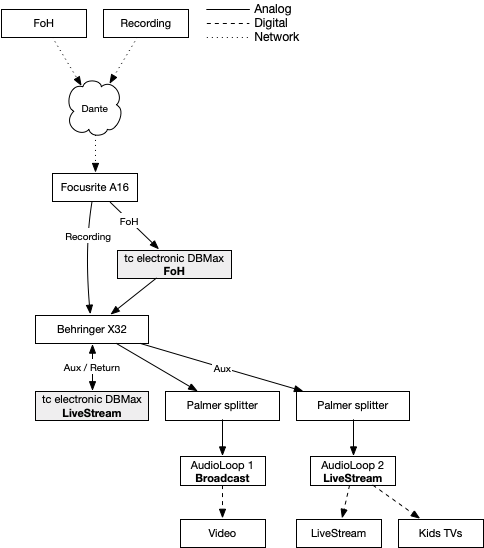
This post describes using a TC Electronic DBMax to enhance the audio of a live stream.
In a live streaming situation, control of audio levels is critical to providing listeners and viewers with a great auditory experience. Inconsistent levels, or levels that are too loud or too soft result in a suboptimal experience, which degrades the performance.
The TC Electronic DBMax (Digital Broadcast Maximizer) is an ideal device for stabilizing and enhancing audio for live streaming and live recording situations. It supports up to three pre-dynamic inserts (AGC, Parametric EQ, 90 deg. mono, Dynamic Equalizer, Stereo Enhance, Normalizer, MS Decoding and MS Encoding), an expander, compressor and limiter, and a single post-dynamic insert (Transmission Limiter or Production Limiter). The EQ, compressors, and limiters are all 5-band, and provide broadcast quality results. It is basically a Finalizer 96K on steroids.
In my role as recording lead at ICF, I use two separate DBMax devices to solve two separate problems. 1) stabilize the FoH signal for video, and 2) boost the stabilized signal for streaming. Once I put these two devices in, the video team I work with thanked me multiple times as they have a stable audio level they can rely on for single every event, no matter what kind of event, and they love the audio quality.
The first DBMax balances audio levels between a live worship session, where audio levels during worship are 10–15dB louder than the normal speaking volumes, and speaking sessions. The goal is to provide a signal that roughly meets the -23 LUFS broadcast standard in Europe, which means the audio recorded for video needs no additional post-processing for release to public TV (which we do for special events).
The feed coming from the FoH board is limited (with the Waves L2 Ultramaximizer), which provides a known maximum audio level.
The first insert is the Normalizer, which gives a small 3dB boost to the the overall audio level. The focus is to bring speaking parts into a better working range for later processing.
The second insert is the AGC (Automatic Gain Controller), which automatically raises the volume by up to 3dB (for soft speaking), or reduces it by up to -20dB (for loud band numbers).
The third insert is Stereo Enhance. The FoH provides signal for the main audience, but the stereo image in a live situation is typically reduced so that audience members on the far left/right sides don’t hear only a mono left or right signal. This insert provides a wider and more natural signal for TV viewing.
The 5-band expander is not used.
The 5-band compressor does a decent amount of compression, typically several DB. The advantage of a 5-band compressor is that kick and tom hits will not result in the overall signal being compressed, giving a more transparent sound.
The 5-band limiter catches loud peaks that might have made it past the compressor and AGC.
The last insert is the Production Limiter, which limits the overall sound signal. It is rarely triggered, and is mostly there to catch anything left.
The second DBMax takes the audio from the first DBMax, and boosts it to roughly -14 LUFS for live streaming on internet, and for streaming to TVs throughout the building (e.g. for parents in the children’s area). The -14 LUFS level was chosen as both YouTube and Apple both use this standard, and signals recorded from this DBMax require no additional post-processing for release to those streaming platforms (for video or podcasts).
The first insert is the Parametric EQ, which boots the signal 9dB, and applies a shallow high-pass and low-pass filter to strip off extra energy that laptop speakers and most headphones cannot reproduce.
The second insert the Spectral Stereo Image, which widens signals above 50 Hz, making for a better experience on headphones or laptops.
The third insert is the AGC, which makes minor signal adjustments of ±3dB to produce more consistent results.
The 5-band expander is not used.
The 5-band compressor provides fast and light 2.0:1 compression, and a 3.9 dB boost.
The 5-band limiter catches loud peaks that might have made it past the compressor.
The last insert is the Production Limiter, which limits the overall sound signal. It is rarely triggered, and is mostly there to catch anything left.
For those who are curious, the DBMax introduces roughly a 5ms delay into the audio signal chain, which must be compensated for when aligning the audio and video signals together. The video signals I’m working with have an 80ms latency delay, so I apply an additional 75ms delay using a Behringer X32 console, which was a console already available to me.
If you are interested in buying a used DBMax, they can frequently be found on eBay in the $700–1500 price range. New they are $4000+, so the used price is quite good. With patience, I’ve purchased three in the $700-$800 range. Try to purchase a device with the v2.60 or v2.90 firmware as the v2.02 firmware has a several minor issues that were fixed in the v2.60 release.
If you’d like to know more, let me know in the comments. For the actual settings, see this Google spreadsheet.
This post provides steps for updating TC Electronic DBMax firmware.
The latest firmware (v2.90) along with installation instructions are available from the tc electronic Music Tribe site. The instructions only describe using a M5000, which I don’t have, so I needed another solution.
[Update 2020-05-31] The firmware link no longer seems to work, so I’ve uploaded the dbmv290.zip firmware to this site.
The DBMax has a built-in PCMCIA card reader for storing settings, and which can be used to upgrade the firmware. According to the manual, the DBMax supports Type 1 PCMCIA cards with a minimum of 64KB SRAM and a maximum of 2 MB. Although settings can also be stored and recalled via MIDI, the firmware can only be updated via PCMCIA.
TC Electronic devices interact with the PCMCIA card as a raw storage device, and do not utilize a filesystem such as FAT. This means that the firmware must be copied as raw data to the device using software capable of doing so.
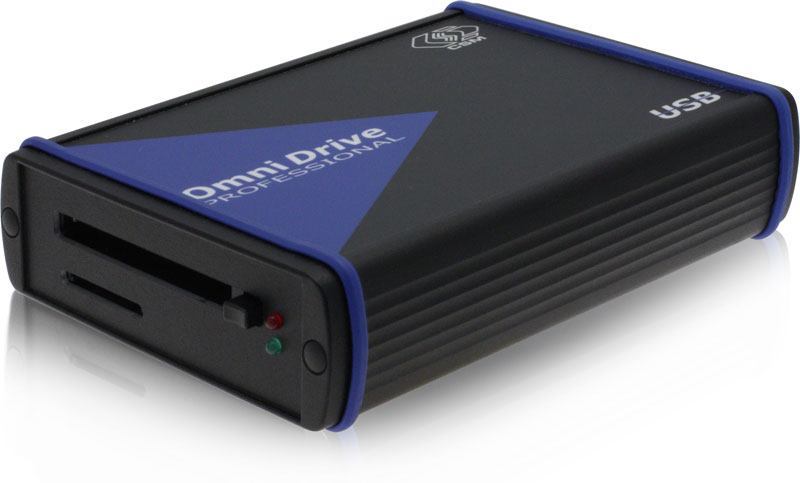
The solution I’ve found for copying the firmware to a PCMCIA card with a CSM OmniDrive USB2 Professional PCMCIA card reader. Unfortunately, PCMCIA cards are no longer common as they once were, and finding a drive proved to be both difficult, and expensive ($350 on eBay), but it works. Alternatively, an old laptop with a PCMCIA card reader should work, or with a TC Electronic M5000 (not the M5000X) and a 3.5″ floppy drive.
OmniDrive USB LF SD
The OmniDrive site provides downloads for Windows which include a Software Driver (v3.3.4) that enables reading/writing of a PCMCIA card as a normal drive, and PC Card Manager (PCM) (v3.1.1) which enables reading/writing of a PCMCIA card as a raw storage device. The PC Card Manager is required for updating firmware.
To copy the firmware to the PCMCIA card…
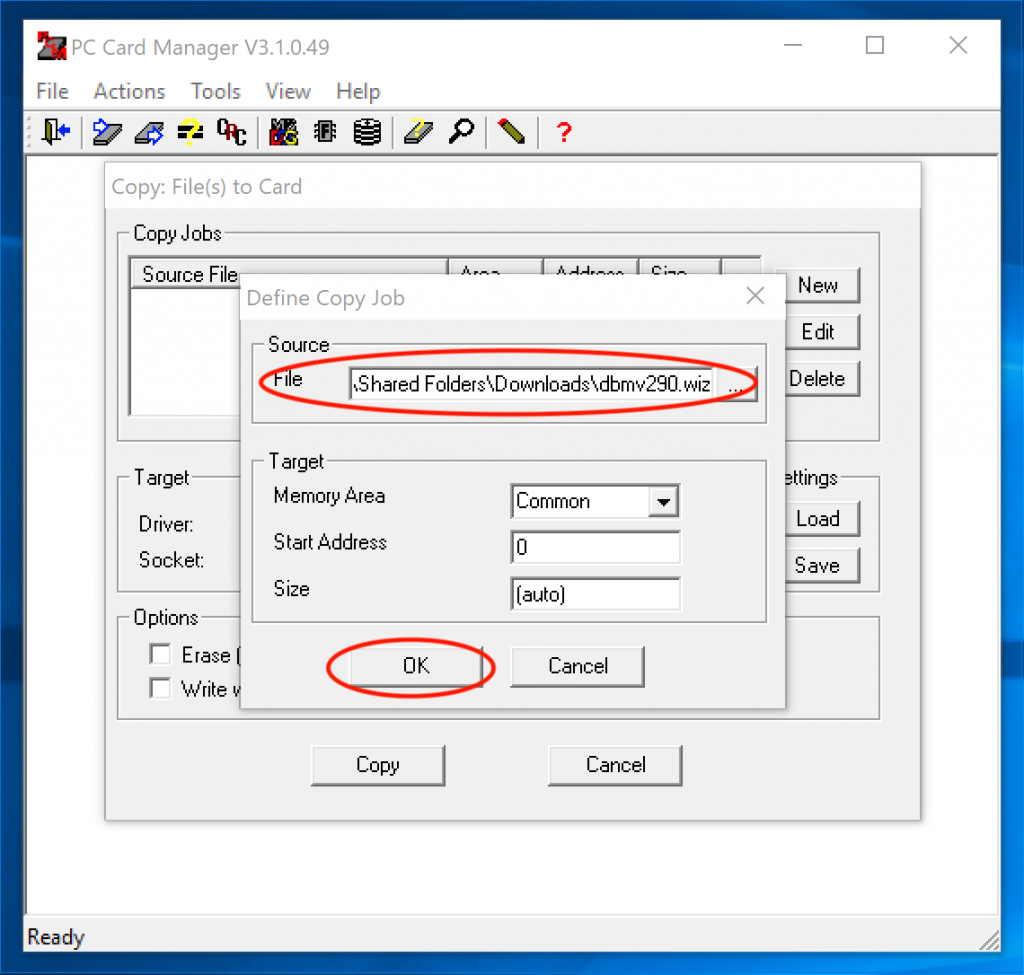
Unzip the dbmv290.zip file, which should provide a dbmv290.wiz file.
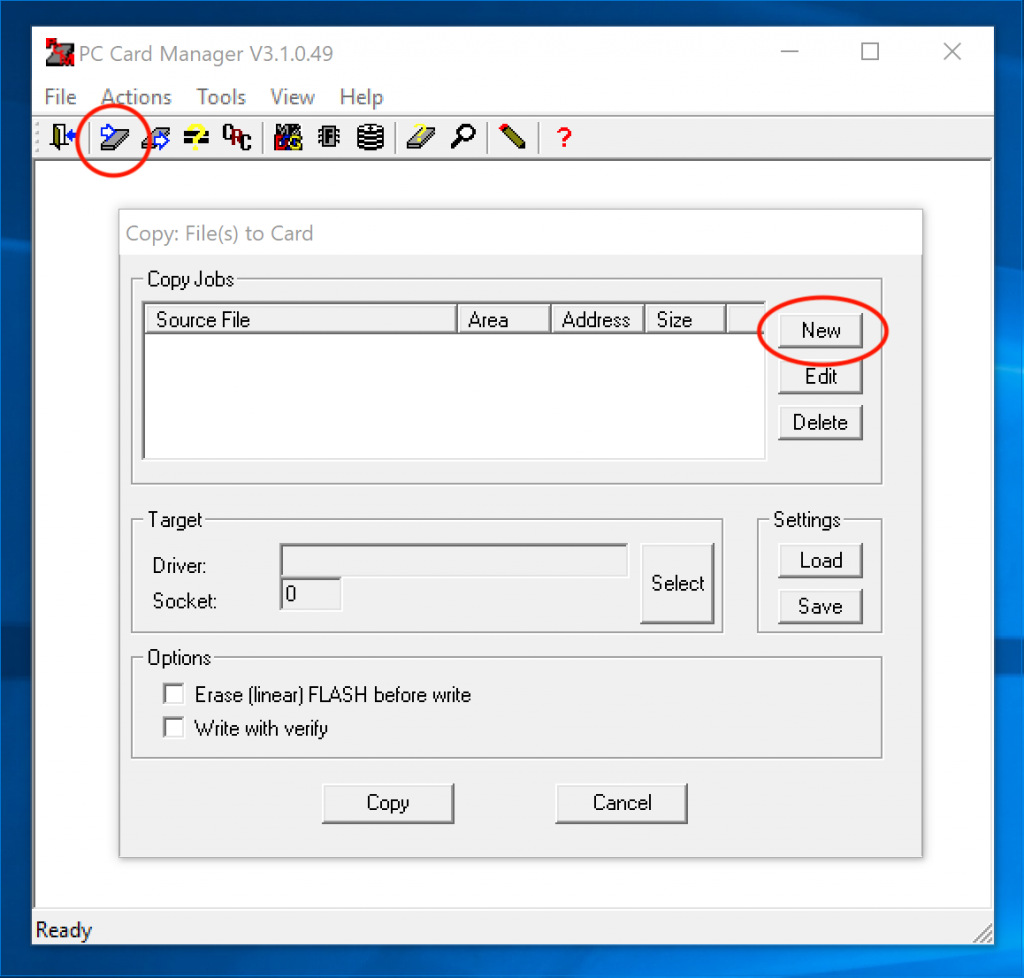
Open the PC Card Manager software.
Click the “Copy file(s) to a PC Card” icon.
Select “New” to start a new Copy Job.
Choose the dbmv290.wiz file as the Source File, and click “OK”. If the file isn’t listed, make sure file dialog is showing “All files”, not just “Images (*.PCC;*.PCA)” files.
Click “Copy”. This should take <1 second.
To copy the firmware to the DBMax…
Insert the PCMCIA card into the DBMax.
Power the DBMax on while holding the “Help” button.
Press the “OK” button to initiate the firmware upgrade. This should take <10 seconds.