Avid S3L-X, AVB, and the Netgear GS724Tv4 network switch

I’m part of the audio team at ICF, and learned that we had an unused Netgear GS724Tv4  network switch lying around. The switch was originally purchased to connect multiple AVB devices together, similar to the MOTU AVB Switch, but with more ports, and because the MOTU doesn’t work with the Avid S3L. Unfortunately, nobody had ever gotten it to work with AVB, so I took a stab and wrote up the instructions below.

Using a Netgear GS724Tv4 network switch to pass AVB between a Mac Pro and the Avid S3L-X

I can confirm that the switch works (firmware version 6.3.1.19 tested).

Starting with factory default settings, here are the step-by-step instructions. These instructions came from Updating Netgear GS724Tv4 config for Tesira AVnu certification with one small modification.

  1. Click on the Switching tab, then click on the Auto-VoIP sub-page. In the “Protocol Based Port Settings” table, click the checkbox in the top-left corner to select all ports and enable Auto VoIP Mode for all ports. Then, click Apply in the bottom-right corner.
  2. Click on the 802.1AS sub-page. Set the 802.1AS Status to Enable. Then, click Apply in the bottom-right corner. There will be an EAV advisory note which pops up after you hit Apply, which you can ignore.
  3. While still on the 802.1AS sub-page click on the Advanced > 802.1AS Port Settings. In the purple header row at the top of the list select the check box to select all ports. (Consider to uncheck ports g25 and g26 to prevent AVB traffic flowing into the backbone network.) Enter a value of 5000 for the Pdelay Threshold. Then, click Apply in the bottom-right corner.
  4. Click on the MRP sub-page. Set the MSRP Mode to Enable. Ensure that all other options are disabled. Also, set MSRP Max Fan In Ports to 26. Then, click Apply in the bottom-right corner. There will be an EAV advisory note which pops up after you hit Apply, which you can ignore.
  5. While still on the MRP sub-page click on the Advanced > MRP Port Settings. In the purple header row at the top of the list click the checkbox to select all ports and then select Enable for MVRP Mode and MSRP Mode and enter values of 20 for the Join Time, 120 for the Leave Timer, and 2500 for the Leave All Timer. Then, click Apply in the bottom-right corner.
  6. Click on the VLAN sub-page. Under the Advanced settings choose Voice VLAN Configuration. Enable the Voice VLAN Global Admin Mode at the top of the page. Then, click Apply in the bottom-right corner.
  7. While still on the VLAN sub-page, under the Advanced settings choose VLAN Membership. In the VLAN ID dropdown choose VLAN ID 2, in the Group Operation dropdown choose Tag All. Click the T for ports 25 and 26 to untag these. Finally, click Apply in the bottom-right corner.
  8. Click on the Switching > LAG sub-page. In the purple header row at the top of the LAG Configuration list select the check box to select all ports, uncheck ch25 and ch26, and select Disable for Admin Mode, STP Mode, and Link Trap.  Then, click Apply in the bottom-right corner.
  9. Power cycle the switch.

The one small modification to the instructions was in step 4, where I removed references to MVRP. In my experience, enabling MVRP will cause the E3 to lose connection to its internal network switch, and the only way to fix this is to cleanly shutdown the E3, then remove the power plug and wait for the green power light to go out. I did not test enabling it for everything except the E3. (Apparently this is a known issue — search for VSW-10570 in the “What’s New in VENUE 4.6.1” document that comes with the VENUE 4.6.1 release.)

If you want to use Dante and AVB together, I suggest reading the Using Dante and AVB protocols together on the Netgear GS724Tv4 switch document. As of 2018-01-22 I haven’t tested those instructions.

Booting an Avid S3L-X remotely with Wake-on-LAN

E3 Engine

The E3 engine can be remotely powered on and started using the Wake-on-LAN protocol.

To remotely wake the E3 engine, you need three things:

  1. A computer that is connected to the same Ethernet network as the E3 engine.
  2. The MAC address of the engine. You can get the MAC address by going to the Options > Devices tab and right-clicking on the E3 engine image.
  3. The IP subnet address of the network. (Optional, depending on the software used.)

To shut the E3 engine down, use the VENUE Options > System > Shutdown button.

Software to wake the E3 engine

There are several software packages available to send the special Wake-on-LAN Magic Packet.

Mac

  • Wake On Lan by Depicus (Mac App Store, $1.99)
  • Remote Desktop (Apple, $79.99) – Also useful for controlling the S3L-X remotely.

Windows

  • MagicPacket by DecaTec (Microsoft Store, Free)
  • Wake On Lan by Sepiro Ltd (Microsoft Store, Free)

Command-line

For those comfortable with the command-line, a short Python script will also do the job. Save this script somewhere as wakeonlan.py and make it executable with chmod +x.

#!/usr/bin/env python
# https://apple.stackexchange.com/questions/95246/wake-other-computers-from-mac-osx

import socket
import sys

if len(sys.argv) < 3:
 print "Usage: wakeonlan.py <ADR> <MAC> (example: 192.168.1.255 00:11:22:33:44:55)"
 sys.exit(1)

mac = sys.argv[2]
data = ''.join(['FF' * 6, mac.replace(':', '') * 16])
sock = socket.socket(socket.AF_INET, socket.SOCK_DGRAM)
sock.setsockopt(socket.SOL_SOCKET, socket.SO_BROADCAST, 1)
sock.sendto(data.decode("hex"), (sys.argv[1], 9))

Myself, I keep a copy of the script in my ~/usr/bin directory. To wake my system, I call the command like this, where 172.16.0.255 is the subnet of my network, and 00:90:fb:4a:13:9e the MAC address of my E3 engine.

$ ~/usr/bin/wakeonlan.py 172.16.0.255 00:90:fb:4a:13:9e

Stage 16 Box

The Stage 16 Box cannot be remotely power cycled without additional equipment. Some suggestions include:

  • Furman CN-1800S + Furman BB-RS232 giving control via Ethernet.
  • Furman M-8S (US) or the Furman PS-8RE III (Europe) connected to the GPIO connection from the E3 engine, along with an event (saved in the default show) to latch a GPIO when the system is started. Attempt only if you feel comfortable with electronics. If you would like me to build this setup and demonstrate it, send me an email.

My struggle to setup a Linksys WRT54GS v.4 in client-bridge mode

The problem

I’ve been fighting for weeks now trying to get my home wireless network to work smoothly. I’m living in an apartment in Ireland, built in the 1970’s, that has concrete walls for every single wall in the house. It does wonders for my wireless signal, and to date the only thing that has provided a decent (albeit not strong) signal in all rooms was a Linksys WAP54G.

I recently purchased my first Mac desktop (the wonderful Apple 27″ iMac with the quad-core i7 chip). It is a brilliant machine, the fastest I’ve ever owned, and I didn’t want to limit it with a slow wireless connection. My partner and I both have Mac laptops as well, and I wanted to see a speed improvement there too. Finally, we both have Wifi enabled phones, I have an iPod, there are a couple of AirPort Express for broadcasting iTunes music and sharing a printer, an AppleTV for renting movies, and a Popcorn Hour A-110 that we stream movies to (using one of the AirPort Express as a bridge).
To improve my network, I went with the latest Apple AirPort Extreme (Simultaneous Dual-Band II). My hope was that I could 802.11n at 5GHz for the Macs, and 802.11n and 802.11g at 2.4GHz for the rest. Unfortunately though, despite MUCH fiddling (trying lots of channels, fiddling with this that and the other, etc.), I kept running into problems. First off, the only place in the apartment where I could get a usable 5GHz signal (decent as defined by sustaining more than 3MiB/s transfers) was at the kitchen table about 5m away from the AirPort (through one wall). In my bedroom (about 10m away from the AirPort and through three walls) where the 27″ iMac is, I usually could get between 24-144Mbps signal (never constant) and could usually sustain around 1.7MiB/s transfers. And, I could not for the life of me get a good streaming signal – one that always worked without pauses – to stream movies to the Popcorn Hour in the living room (about 10m away and two walls). Sometimes, yes, but not always. This situation is actually worse than it was before!
I must say that I love the AirPort Express for its ease of configuration, and its IPv6 support, but it just isn’t working for me with the vast amount of concrete I have.

To try to solve my problems with my iMac, I decided to configure an old Linksys WRT54GS I have in a client-bridge configuration. The Linksys has two spiffy antennas with potentially better gain than the built-in antenna of the iMac. I chose the WRT54GS as it has a built-in switch – which would be nice to have in the bedroom – whereas the WAP54G I used in the past has only a single port.
As it turns out, after spending literally hours trying to get such a configuration working, the solution was incredibly simple. I found lots of interesting but conflicting information on the web about how to do this, but was unable to get any of it to work. I must be honest and state that I did not want to use the nvram command to do the configuration. I just find that such by-hand configurations are hard to reproduce should I need to someday, and prefer to have a documented, easy-to-understand, and repeatable solution instead.
I finally decided to forge ahead without docs to see what I could get going.
The solution


This section assumes a cleanly installed OpenWrt firmware on the router. (See below on how to reflash with TFTP if you need.) It also assumes you are logged into the more advanced Administration mode (not the default Essentials mode) of the OpenWrt interface.
Configure the WAN interface (Network > Interfaces > WAN)
I changed nothing here.
wan
Protocol: DHCP
Bridge interfaces: unchecked
Interface: eth0.1
Zone: wan
Configure the LAN interface (Network > Interfaces > LAN)

My local network subnet is 172.18.0/24 so I placed the LAN interface within that subnet. By doing this, I can telnet into the router without needing to specially configure a machine to talk to it.
lan
Protocol: static
Bridge interfaces: checked
Enable STP: unchecked
Interface: eth0.0
Zone: lan
IPv4-Address: 172.18.0.11
IPv4-Netmask: 255.255.255.0
IPv4-Gateway: 172.18.0.1
DNS-Server (added): 172.18.0.1
Click Save.

Configure the wireless to join my existing network (Network > Wifi > WL0)
Device wl0
enable: checked
Channel: auto
Transmit Power (dBm): 70
802.11h (added): checked
WMM Mode (added): checked
Interfaces
ESSID: KWAB
Network: lan
Mode: Client
Encryption: WPA2-PSK
Key: ******* (I’m not giving that up!! 😉 )
Click Save.
Switch (Network > Switch)
The Linksys WRT54GS v.4 uses slightly different VLAN ports than other routers. Basically, the WAN port is #0, whereas most other routers it is #4. I updated accordingly.
ETH0
ethX.0: 0 1 2 3 5*
ethX.1: 4 5
Click Save.
DHCP (Network > DHCP)
DHCP is enabled by default. It must be disabled. Uncheck the Dynamic DHCP option.
Click Save.
Apply all the changes (Changes > Save and Apply)
Once the settings are applied, the router should be pingable at 172.18.0.11 and the normal network should also be accessible using normal means (in my case DHCP). I have noticed that the router sometimes gets confused at this point, and a simple reboot [by pulling the plug] fixes that.
Enable multicasting
By default, the network interfaces do not support the full set of multicasting required for Bonjour and mDNS to work (two things I can’t live without with my Macs). To get them going, we need a quick shell script.
Edit the /etc/firewall.user script, and add these lines to it:
# enable full multicasting
for iface in br-lan eth0 eth0.0 eth0.1 wl0; do
ifconfig ${iface} allmulti
done
Run the script to setup the multicasting. In case you were wondering, Tte script will be executed automatically by the firewall script on subsequents boots.
We’re done!
The Result
After all was said and done… I still wasn’t happy 🙁
The iMac talking directly to the AirPort Extreme (jumping between 24-144Mbit/s as reported by the AirPort) was usually able to sustain 1.7MiB/s transfers, while the Linksys (jumping between 18-54Mbit/s as reported by the AirPort) could usually sustain only around 400KiB/s, more than 4x slower. Grumble.
I also use IPv6 on my network, but the Linksys isn’t bridging it through. It means when I do lookups for addresses like freenas.local (my NAS) I get the IPv6 address which I cannot talk to. There is probably a solution to that, but I haven’t looked into it yet.
In any case, back to the drawing board.
References
OpenWrt release: Kamakaze 8.09.2

Reflashing with TFTP
More than once, I locked myself out of the router during my fiddling. Luckily, OpenWrt has a default boot mode one can go into by holding down the reset button during power-on, releasing it once the DMZ LED lights. In this mode, the IP of the router returns [temporarily until reboot] to 192.186.1.1, and it allows telnet access without a password. Using telnet, I was able to manually erase the firmware, then reflash new firmware with TFTP.
To reset the router, I followed these steps:
  1. Placed a copy of OpenWrt in my ~/Downloads folder
  2. Changed to my ~/Downloads folder
    $ cd ~/Downloads
  3. Set a static IP on my laptop to 192.168.1.2
  4. Added a manual ARP entry (needed later for TFTP) to 192.168.1.2 (valid for OS X 10.5/10.6)
    $ sudo arp -s 192.168.1.1 00:16:b6:1e:a2:3f
  5. Telnetted into the router. For this to work, you must be plugged into the LAN portion of the router (the switch section) and not the WAN port (the Internet port).
    $ telnet 192.168.1.1
  6. Erased the flash on the router
    # mtd erase linux
  7. Pulled the power out of the router
  8. Started TFTP on my laptop
  9. $ tftp 192.168.1.1
    tftp> mode binary
    tftp> rexmt 1
    tftp> timeout 90
    tftp> trace
    Packet tracing on.
    tftp> put openwrt-wrt54gs_v4-squashfs.bin
  10. Plugged the router back in
  11. Waited for the firmware to flash. You should see something similar to this if the upload works:
    sent DATA 
    received ACK
    sent DATA
    received ACK
    ...
    sent DATA
    received ACK
    Sent 2166816 bytes in 61.9 seconds

    The number of blocks will of course be different for the release of OpenWrt you use.

The router will reboot on its own, and become available on the IP 192.168.1.1.

I’m up and running with IPv6

I don’t know why, but I got a bee in my bonnet today and decided to setup IPv6. As it turned out, I already had the necessary hardware (an Apple Time Machine which is also a full featured AirPort Extreme Base Station) and only needed a tunnel broker. After some googling, I came up with a list of several and decided to try one out.

The first one I tried was SixXS. After going through the sign-up and email verification, I was left waiting for validation of my data. Humpf. Not so fun. After waiting all of maybe two minutes, I decided to try another.

I rang up a friend from work to find out who he uses. He recommended Hurricane Electric so I gave them a try. All I can say is I was amazed how quickly and easily I got an account setup, and got my tunnel information. They even allow up to four tunnels on the account, which means I could set one up at my brother’s house as well.

The difficulties came in three areas.

  1. Getting the Time Capsule configured
  2. Getting my ADSL router to route packets to the Time Capsule
  3. Updating my WPAD files so that IPv6 traffic would not use my proxy

Configuring the Time Capsule

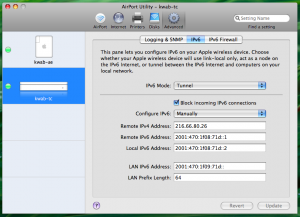
Hurricane provided me with the following information to setup my IPv6 tunnel with.

Server IPv4 address: 216.66.80.26
Server IPv6 address: 2001:470:1f08:71d::1/64
Client IPv4 address: 87.198.128.166
Client IPv6 address: 2001:470:1f08:71d::2/64
[Client] Routed /64: 2001:470:1f09:71d::/64

In AirPort Utility, I went into manual mode for the Time Capsule, selected Tunnel mode on the IPv6 page (Advanced > IPv6), and pasted the info in, including manually setting the LAN Prefix Length. (In case you were wondering, my firmware version 7.3.2, the /64 prefix is automatically stripped once Update is clicked).


Once the Time Capsule restarted, I looked at my network settings on my MacBook Pro, and found that I now had an IPv6 address that was in the LAN IPv6 range. I tried ping6 ipv6.google.com, but it didn’t work. After lots of troubleshooting, I realized that I could ping only the Local IPv6 address of the Time Capsule, but not the Removte IPv6 address. That made me think router.

Configuring the router

Honestly, this was a piece of cake once I figured out where all the settings were. Basically, I had to disable the firewall on the router and then set it to forward all packets to the Time Capsule (I set it as the default server). Once I had those two things, I was able to ping6 ipv6.google.com, but was unable to pull up http://ipv6.google.com/ in my browser.

Configuring WPAD

To make my life easier, I have WPAD (Web Proxy Autodiscovery Protocol) setup on my local network so that the Auto-detect proxy settings for this network works in Firefox. I use Squid for my proxy on separate Linux server, but unfortunately the version I use (3.0STABLE1 on Ubuntu 8.04) doesn’t support IPv6. (The newer 3.1 release apparently does, but I’m not in the mood to spend lots of time compiling a new binary today.) I did some googling and found that I could make a single minor change to my wpad.dat file to get things working.

The basic change was to add a dnsResolve() check that was then compared against anything with a “:” in it. IPv6 addresses have colons ‘:’ in them, but IPv4 addresses don’t. If an IPv6 address is found, the proxy gets skipped. (I’ll save Squid 3.1 for another rainy day).

Here’s the final version of my wpad.dat.

function FindProxyForURL(url, host) {
if (host == "localhost" || host == "127.0.0.1") { return "DIRECT"; }
if (isPlainHostName(host)) { return "DIRECT"; }
if (shExpMatch(host, "*.local")) { return "DIRECT"; }

// route ipv6 directly
if (shExpMatch(dnsResolve(host), "*:*")) { return "DIRECT"; }

return "PROXY 172.18.0.8:3128; DIRECT";
}

function LocalFindProxyForURL(url, host)
{
FindProxyForURL(url, host);
}

That is pretty much it. Overall the process was much simpler than I expected. Hopefully this helps someone else get their IPv6 running as well!